Microservices with RabbitMQ and Docker
Many web applications start their lives as single projects that can be contained in a single project folder and a single git repository which initially makes it easy to develop, test and scale. This pattern is commonly known as a monolithic application.
In short, when applications get very big and complex, these monolithic applications commonly get replaced following a microservice architecture, which decomposes large applications into smaller, decoupled, minimalist and specialized applications that are designed to do one thing well.
In order to read more about these patterns check out http://microservices.io/, here we will dive directly onto an experiment we performed and a possible practical approach to initially develop around this architectural pattern.
One of the main challenges that we face when developing an application using the microservices paradigm is how are we going to distribute and communicate these microservices. For the purpose of our experiment we developed a simple application that shows a way to overcome the communication and distribution problems. We choose RabbitMQ to connect and scale microservices and Docker as mean for lightweight virtualization on the cloud.
There are many other concerns that need to be taken into account, like routing, fault tolerance, monitoring, among many others, but that is something to be discussed in later posts.
Microservices test example
In this example we create a simple application which is decomposed in several microservices and uses parts from examples taken from RabbitMQ. The microservices are developed in the ruby language and use the Bunny ruby client to communicate with RabbitMQ.
Each microservice has the responsibility to do a simple task and return the result to the underlying messaging system so that another microservice continues the job. The communication between the microservices is done via RabbitMQ queues, which results in a microservice consuming data from a queue and publishing the outcome to another queue. As a result, a chain of microservices processes the requests.
The following diagram depicts how the microservices are organized in our example and how they communicate with each other:
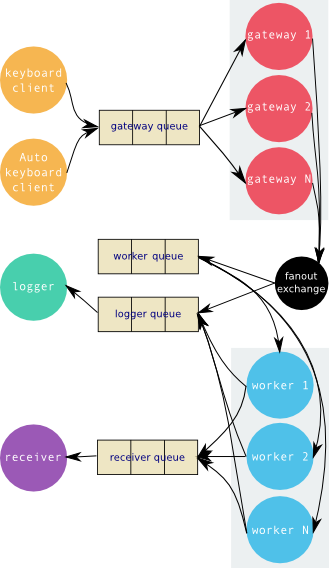
Here we have setup two clients that can make requests to the receiving microservices, one of them receives input text from the user to send and the other one automatically sends generated messages, so that we can see the continuous operation of the whole service.
The gateway microservices (can be 0 or more) are subscribed to the gateway queue, so when new messages are pushed to the queue they are pulled by any gateway microservice in a round-robin manner (see work queues), this way we can scale up a microservice.
The gateway just has the task to publish the messages to multiple consumers (publish/subscribe pattern) through a fanout exchange that broadcasts the messages to the logger and worker queues to be consumed by the logger and workers microservices.
The logger microservice has the task of print in the screen the messages from the logger queue.
The worker microservices (can be 0 or more) are subscribed to the worker queue for input and have the task of transforming the messages that contain any digits in them. If the messages match the pattern then are pushed to the receiver queue. If not they are pushed again to the logger queue, but with a different message. We can also simulate a long running task by introducing messages that contain dots "." in them. In any case the messages are pushed too to the logger queue.
Finally the receiver microservice has the task to print in the screen the messages from the receiver queue.
Dockerizing the microservices
The encapsulated Docker containers enable microservices by creating a highly efficient distribution model for applications. For our example we are going to create a Docker container for each microservice.
To run the microservices in Docker we create a Dockerfile that contains all the commands in order to build our Docker image.
The Dockerfile used is based on an ubuntu image that we have prepared installing rbenv and ruby, you can check out the image here: jpamaya/ruby-2.1.1. Having this base image we just need to copy the project files from microservice-test-01 and install the gem dependencies as usual with bundler.
We also need to run the RabbitMQ server in a Docker container, to accomplish this we used an already created Dockerfile from dockerfile/rabbitmq.
After having the containers ready we just run the RabbitMQ server container and each microservice container, making them visible to each other through the use of Docker's linking.
The descriptions above are general enough to give an idea of what was done. Please check out the project's README where you can find detailed instructions to run the microservices in your local machine or with the docker containers.
Don't forget to leave any comments or questions. Cheers!
Miguel Diaz
 Miguel works as technical director at CodeScrum - a company dedicated to creating user centric digital services and products. Miguel enjoys building web applications and services to help businesses improve and do their best.
Juan Pablo Amaya
 Juan is a product developer at CodeScrum - a company dedicated to creating user centric digital services and products. Juan practices continous learning and problem solving.