Organize your Puppet workflow with Bebox
The problem
There are many provisioning open source software projects right now that allows us to do the configuration and management of IT infrastructure. Of all the tools availble, here in Codescrum, we decided to work in some of our projects with the open source version of Puppet.
Puppet is an infrastructure automation tool for provisioning environments.
What we did
While working with Puppet, we noticed that we needed an "opinionated" way of organizing all those files and folders to make our lives easier. That is a repetitive task that is prone to errors and delays. Thats why we built Bebox.
Bebox lets us organize and automatically generate a provisioning structure for our projects through a command line application.
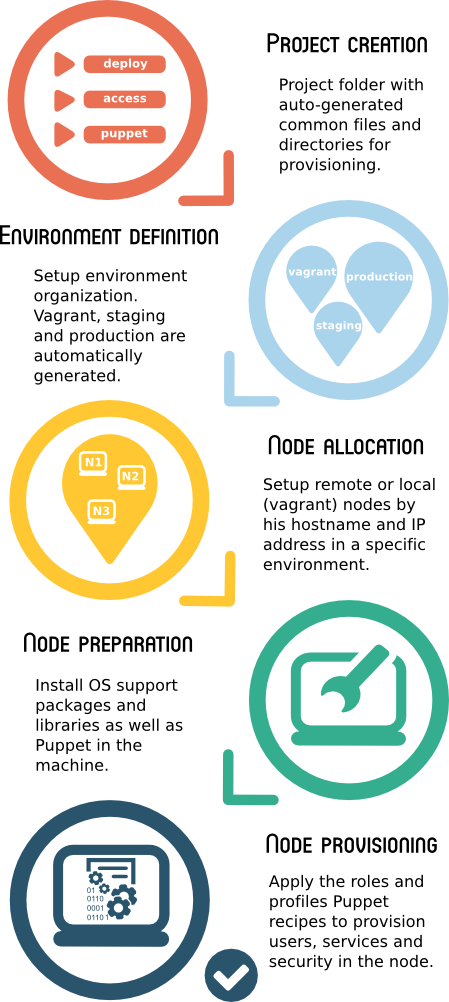
Bebox's workflow is made up of five (5) phases.These phases are:
- Project creation
- Environment definition
- Node allocation
- Node preparation
- Node provisioning
All phases have their own set of commands and execute some action through simple wizards that receive input from the user.
The idea here is that all Puppet repositories look alike in our company and that we know where to search for certain things. This gives us the following benefits:
- Reduces the steps to build and reproduce a production-like environment in our machines
- Helps us "incubate" Puppet modules, prior to being extracted into independent modules
- Have a consistent mechanism for reproducing a Puppet-based project
- Apply layers of configuration to managed systems
- Simplify sequential provisioning steps
The workflow
Bebox’s workflow is comprised of the five (5) phases explained below:
Project creation
In this phase, we use Bebox to generate an initial skeleton within a project folder (just like Rails does) for the configuration access/deployment and a Puppet structure for puppet's resources.
$ bebox new PROJECT_NAME
$ cd PROJECT_NAME
Environment definition
After the project structure is created we can use Bebox's CLI to further customize any number of deployment environments. By default Bebox sets up boilerplate for production, staging and vagrant ('vagrant' is like 'development', but we named it differently since it is a kind of a "local production"). Bebox uses Vagrant to run the provisioning in a virtual machine hosted in the local machine, and configures these machines in the default "vagrant" environment.
Some useful commands for managing the environments and setup folder structures and files for this are:
$ bebox environment new ENVIRONMENT
$ bebox environment remove ENVIRONMENT
$ bebox environment list
Note: we run the commands above inside the project directory.
Node allocation
A node for bebox is any machine needed by the service that needs provisioning. A service can be composed of any number of nodes, at least one (1). For example a service can have a machine for the web application, another machine for the database backend and a third one for a replica of the database. The nodes can be configured for each environment and are basically defined by their hostname and IP address.
Some useful commands for managing nodes and setup folder structures and files for this are:
$ bebox node new
$ bebox node remove
$ bebox node list [--environment ENVIRONMENT] [--all]
Note: wizards will ask for any information needed to conclude the command.
Node preparation
This step executes the installation of Puppet in the remote (or local) machines. To access the machines, Bebox has a directory to configure the ssh keys used for each environment. For the "vagrant" environment, the virtual machines are created automatically by Bebox.
$ bebox prepare [--environment ENVIRONMENT]
Node Provisioning
Based on our experience working with Puppet, we separate this phase into four (4) common steps that define clear layers of configuration, but the user can add or remove any step at will. Based on our particular experience, we named these steps: fundamental, users layer, service layer and security layer.
$ bebox apply [STEP] [--environment ENVIRONMENT] [--all]
Fundamental step
This step creates a "puppet" user account that would be used to execute all other provisioning steps. This is done to have all environments as similar as possible, because in some systems the superuser is known as ‘root’ while in others like vagrant is named ‘vagrant’.
User layer step
Any system user that is needed to exist before any service level provisioning, can be created in this step.
Service layer step
The service layer is what you would have in your regular puppet provisioning repo. We follow the roles and profiles scheme for better organization of the Puppet manifests declaration.
A list of the commands used when in this phase, following the roles and profiles scheme:
$ bebox role new ROLE
$ bebox role remove ROLE
$ bebox role list
$ bebox profile new PROFILE [-p PATH]
$ bebox profile remove
$ bebox profile list
$ bebox role add_profile
$ bebox role remove_profile
$ bebox role list_profiles ROLE
$ bebox node set_role [--environment ENVIRONMENT]
Security layer step
Finally, after all services are running and configured we can secure them and add extra security tools to the OS (by default we install fail2ban, sysctl, firewall, and some secure settings to ssh).
Conclusion
Keeping a reproducible environment is always difficult. While most of the job is performed by the selected automation tool (in this case, Puppet), there is always room for little optimizations depending on your workflow.
With Bebox, we mostly care about your Puppet code without worrying about all the other tasks around it. We think that Bebox can help you organize and reuse configuration between projects and save you time for the actual provisioning.
Let us know in the comments if you find this tool useful!
Juan Pablo Amaya
 Juan is a product developer at CodeScrum - a company dedicated to creating user centric digital services and products. Juan practices continous learning and problem solving.